If you have a cotton bedding set or indeed any material, provided you are using a flat sheet, then hospital corners can add a stunning touch to your bedroom. Making a bed is one of the simplest and most important tasks in a household. However much effort you might pour into cleaning, tidying and re-arranging your bedroom, the fact remains that no bedroom has ever looked respectable with an unmade bed sitting in the center of it. Learning to properly make a bed, then, is imperative for anyone looking to keep up appearances.
We all might feel we have a grasp of how to make our beds. But, as with shoelace-tying, there are a few extra special techniques which, once learned, will make the difference. If you’ve ever stayed at a fancy hotel – or even a not-so-fancy one – and wondered how it is that they get their beds to look so perfect, then read on: in this article, we’ll walk you through exactly how to make a bed – but first, let’s take a look at exactly why you should do it.
How often should I make my bed?
This question is an easy one: you should make your bed every morning. Though few of us actually do this at first after we’ve moved out and our parents are no longer around to harangue us about it, the practice remains a good one to maintain. As much as you might have resented them at the time, there is a growing body of evidence to suggest that your mum and dad were, in fact, right.
The ritual, besides making your bed look nicer, will also imbue a mental discipline – which has been linked to increased mental well-being and happiness. It will give you a sense of accomplishment early in the day, force you to overcome your own laziness and inculcate you with a regard for tidiness, which will seep into other aspects of your daily life.
How often should I change my bedding?
 While there exists no fixed number, as some bedsheets will need replacing more often than others, a general rule is that sheets, quilt-covers and pillowcases should be washed every couple of weeks. This is because these are the parts of the bed which obviously come into contact with your body.
Two weeks will ideally amount to around 112 hours spent in bed – and during that time, your body can leave behind an enormous quantity of dead skin cells, which, in turn, will attract an enormous quantity of hungry mites. Don’t leave it until the room begins to smell; wash your sheets regularly!
That covers the parts of the bed which you actually touch while sleeping. Where the rest are concerned – the quilt itself, the mattress protector and the pillows – you can afford to be a little more lax. A wash every few months should be more than sufficient.
Consider investing in a mattress protector
If you don’t have a mattress protector, then you are missing out. The protector will offer an extra shield against any dirt which might find its way through the bottom sheet and thereby prolong the mattress’s lifespan. As well as this, it will offer an extra layer of cushioning, enabling you to drift off to sleep that little bit more easily.
How do I make my bed?
The first step is to strip the bed down entirely. Remove the duvet, the pillows and the top sheet. The bottom sheet can be left on, in order to save time if you’re only doing a superficial daily tidy-up – but here we’ll assume that you’re performing a more major tidy up and that you’re replacing the bottom sheet with a freshly washed one.
If there is a mattress-protector on the bed, then this is the best time to adjust it. The things have a habit of working their way crooked if they are not occasionally put back into position – so make sure that it is on straight before proceeding.
Now you can put the new bottom sheet on. The bottom sheet is the one with elasticated corners, which will snap into place over the top of your mattress. This is the most straightforward part of the entire procedure and there is little more to say other than to make sure that you’ve got the right size of bottom sheet for the bed.
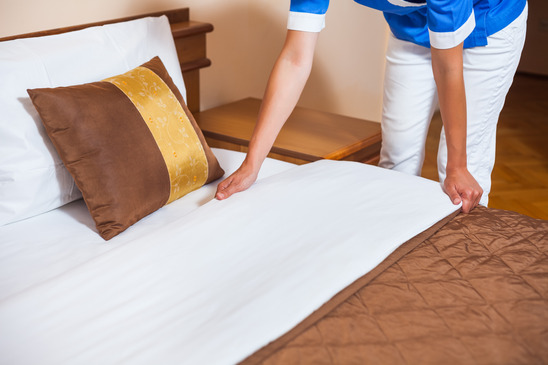
Next, we apply the top sheet – the large, loose, non-elasticated sheet which sits just beneath the duvet (but above the bed’s occupant). The sheet should be lain as smoothly as possible against the mattress, with the largest seam at the top. Make sure that the sheet is parallel to the top of the bed and that the overhang is roughly equal on both sides. If one side of your sheet is patterned, then make sure that it faces downward. This will ensure that when you come to fold the sheet back later, the pattern will be visible.
Opinion is divided on whether a top sheet is strictly necessary – indeed, this section may have cause the most confusion. In the US, the top sheet is far more prevalent, but in Europe our approach is more laissez-faire. You will find them in hotels and youth hostels, but in the home they are less common, with many opting for just a duvet and a bottom sheet.
If you want your bedroom to look as neat as possible, then a top sheet is a valuable ally – so give one a try! If you don’t have a top sheet, you will be unable to perform the ultimate in neatness-improving tricks.
Hospital Corners
It is here that we can employ a technique that can make a bed look especially neat. It’s called the ‘hospital corners’ method. The term originates, as one might expect, in hospitals. Since patients lie on their beds for days at a time, their beds cannot be made all that often. A technique was therefore devised so that the sheet would remain straight and smooth, even after a day’s tossing and turning.
You make hospital corners at home. The technique requires a little bit of practice, but, once mastered, it will allow you to make your bed far more neatly. Let’s walk through the stages involved:
At the foot of the bed, tuck the end of the top sheet beneath the mattress. Make sure that you do this tightly and evenly – if you simply stuff it in there, a smooth finish will be impossible.
Now go to the side and take hold of the sheet around a foot and a half from the end of the bed. Fold this over the top of the mattress, so that it forms a triangular section of sheet, with the side nearest the bed forming a 45° angle from the corner of the mattress.
Now, hold the top of this triangle into place, and uck the sheet hanging beneath the mattress into the side of the bed. Again, the more tightly and evenly you can do this, the better.
Once you have done this, you can either tuck the triangular folded section of sheet underneath the mattress, or you leave it hanging loosely. If you want the tightest possible result, then you can tuck the sheet in. This will form a ‘double-lock’, as you will have tucked the sheet in twice.
Now, repeat this procedure on the other side of the bed. If you’ve done everything correctly, you should be looking at a perfect hospital corner.
If you’d like a visual demonstration of exactly how this should be done, then you can find one here. This demonstration goes a little farther than we do here, with the hospital corners method used on the blanket as well as the bedsheet. If you’d like to achieve this super-neat, military-style look, then you can then tuck both blanket and sheet beneath the mattress.
Once you’ve gotten the mattress in place, the hard work is mostly done. The next step is to lay your duvet on top, as well as any blankets you might want to use.
Finishing touches
Fluffing is very simple – hold a pillow with one hand on either side and squeeze the sides together repeatedly – as though you are bashing two cymbals together. This will jumble up the pillows contents.
If you happen to have feather pillows, then this step is obligatory. Over the course of a feather pillow’s lifespan, the feathers can begin to settle into the bottom and become compressed by both gravity and the pressure applied to them by your head. This causes them to lose their fluffiness and to ultimately need replacing. Fluffing helps to limit this degradation and thereby extend the lifespan of your pillow.
Once this is done, the surface of your pillow will likely be heavily creased. Counteract this effect by giving them a quick smooth with your hands. Now you can replace them at the head of the bed.
You’re almost done – but before we can truly declare this bed made, we should first add the final few flourishes that will help make the difference between a neat, tidy bed and a luxurious one. Place decorative cushions across the top of the bed, so they sit upright against the pillows. You should now have made a bed to be proud of!